Quilt Binding Options: Bespoke Edges from an Expert
Do you dither and question when it comes to finishing your quilt? Of course, there is always a traditional binding, but having quilt binding options ups the ante for personal expression and brings a certain je ne sais quoi to the whole piece. Join Jane Dávila in her quest for bespoke edges.
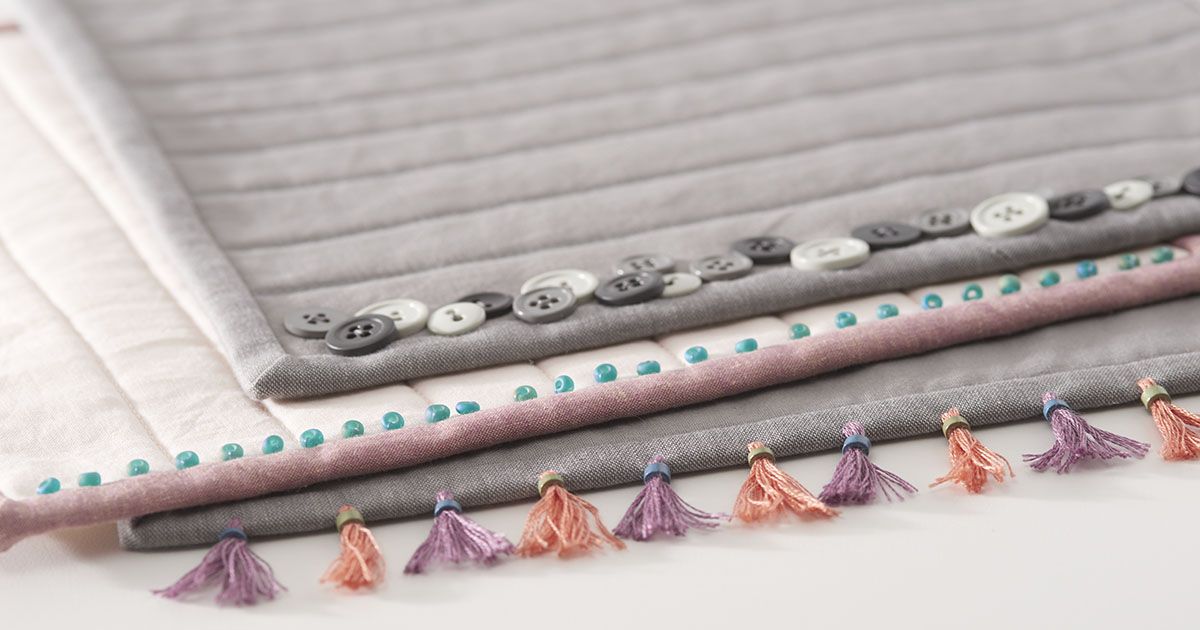
There’s no question: adding detail to the edges of your work can take it from good to great. Sometimes, all a piece needs to take it to the next level is a smattering of beads, a scattering of stitches, or a splash of colorful buttons. Often when we get to the last step of a quilt—finishing the edges—we’re just over it, ready to finish quickly and move on to the next project. I’d like to encourage you to put the same level of care, thought, and intention in finishing the edges of your work that you do with every other part of the project. Well-planned details on the edges elevate the way a finished piece of artwork looks and can add a touch of lux or glam. It’s like the difference between wearing a custom-tailored suit and buying one off the rack. Bespoke edge finishes can be used on quilts, pillows, clothing, bags and totes, and more. Try your hand at these techniques and consider combining them for a truly “bespoke” effect!

Materials
• 6-strand embroidery floss or thick thread
• Beads (I used seed, bugle, and Delica beads)
• Beading thread to match the beads
• Beading needles
• Buttons in a variety of sizes and colors
• Thread to match or contrast with buttons
• Fabric cut into narrow strips or thick yarn
• Tailor’s awl
Optional
• Mechanical pencil
• Glue
Directions
Each bespoke edge finish can be used separately, or combine several together for an interesting look. The materials list includes everything needed for all of the edge treatments described in this article. Read the directions for each bespoke edge treatment to determine the materials needed for each technique.

Beaded edges
Apply traditional double- or single-fold binding to all sides of the project. Using a beading needle and matching beading thread, sew seed or bugle beads along inside edge of the binding by hand. Be sure to secure the thread with extra stitches or a buried knot every few beads. This will ensure that your beads will not all be lost if—by chance—the thread breaks.
Variations
• Try other shapes of beads or combine different shapes for an unusual effect
• Vary the distance between beads
• Sew beads down the center of the binding instead of along the edge
• Attach clusters of beads at the corners of the quilt
• Apply the beads on 3 or fewer sides of the quilt
• Allow some beads to dangle, creating a small fringe or stack the beads along the edge

Button edges
Sew buttons in a clustered row around 1 or more edges of the project. Vary the size and color or shade of the buttons, placing them very close together and even overlapping them slightly.
Variations
• Attach the buttons with a cross stitch or another embroidery stitch
• Use colored thread

Tasseled edges
Note: Before using this edge technique, make sure your beads are large enough to accommodate six strands of embroidery floss plus the needle. Avoid glue that does not dry clear.
Cut (3) 18″ lengths of embroidery floss. Using a tailor’s awl, pierce holes along the bottom edge of the project, spacing them evenly. Thread all 3 lengths of floss through a large-eye needle. Pass the needle through the center of the bead leaving a 2″ tail, then through the pierced hole in the project from front to back, and back through the bead. Push the bead close to the top of the tassel and secure it with a drop of glue if needed. Trim the tassel to the desired length.
Jane Dávila is a fiber and mixed-media artist. Her superpower is creating order out of chaos, but she has been known to make quite a joyful mess in her studio while working. She enjoys long walks on the beach as she lives just three blocks from the water in coastal Connecticut. Visit her website to see more of her work.
Discover even more quilt binding options by catching Jane on “Quilting Arts TV” or picking up the February/March 2019 issue of Quilting Arts!
Sew long,
Katie


Join the Conversation!